In my previous post:
- I setup the objective of our sample application and named it as TodoFX (I know lot of you would have missed the naming part, lack of creativity in naming drives me create portmanteau of technology and usage of app)
- Created the back end for our sample application, in the process we played around with MongoDB (not much though).
Continuing with the application, I would like to:
- Add a few updates to the model and backend APIs we had created earlier
- Develop the UI for our application. This would include 2 parts- Developing the UI for Adding new task and Developing the UI to list all uncompleted tasks.
Updates to the model and the backend APIs:
I thought of introduing “id” field, and this would help us in identifying a particular Todo and mark it as completed. The updated Todo class would be:
public class Todo{
  //Among other fields
  private String id;
  public String getId(){
    return id;
  }
  public void setId (String id){
    this.id = id;
  }
}
Lets also update the TodoDAO, to add a method to get incomplete Todos:
public class TodoDAO{
  //Other methods defined in previous post
  public static List getOpenTodos()
    throws UnknownHostException{
    DB db = DbManager.getDb(DBNAME);
    DBCollection collection = db.getCollection(COLLECTION_NAME);
    DBObject filterObject = BasicDBObjectBuilder.start()
      .add("completed",false)
      .get();
    DBCursor dbCursor = collection.find(filterObject);
    List openTodos = new ArrayList();
    while ( dbCursor.hasNext()){
      DBObject dbObject = dbCursor.next();
      String task = String.valueOf(dbObject.get("task"));
      Date added = (Date)dbObject.get("added");
      boolean completed = (Boolean)dbObject.get("completed");
      Todo todo = new Todo(task,
                           completed,
                           added,
                           dbObject.get("_id").toString());
      openTodos.add(todo);
    }
    return openTodos;
  }
}
One important take away in the above example is the use of a JSON object in the DBCollection#find(), the JSON object which was passed is the query used for fetching the data. And how do you create the JSON object? Using BasicDBObject or DBObject.
We might have to come back and update the DAO to add a method to set a selected task as completed. ( I am working on the UI to get it working well). Ok, I just went back, tried out the API and here it is how we would update the Todo to set it as completed. We need a JSON object to identify what to update and then a JSON object to set the updated value for the attribute/key we want (and this is the reason why we added the “id” attribute in the Todo Model class). We will add the below method to the TodoDAO class (here I would independently give the method, but its a part of the TodoDAO class)
public static void setTodoAsCompleted(Todo todoRef)
  throws UnknownHostException{
  DB db  = DbManager.getDb(DBNAME);
  DBCollection collection = db.getCollection(COLLECTION_NAME);
  DBObject queryObject = BasicDBObjectBuilder.start()
    .add("_id", new ObjectId(todoRef.getId()))
    .get();
  DBObject updateValue = BasicDBObjectBuilder.start()
    .add("completed",true)
    .get();

  collection.update(queryObject,updateValue);
}
We make use of DBCollection#update(query,newValue) to update the DB row/JSON object identified by the query.
That’s pretty much I had to add about back end, yeah I know you are more excited to see about JavaFX and the UI, so lets now create a simple UI. I am thinking splitting this UI into one more post and in this post I would explain about the UI for adding new task.
Developing the UI for TodoFX – Add new Task UI:
Once completed, the UI would look like:
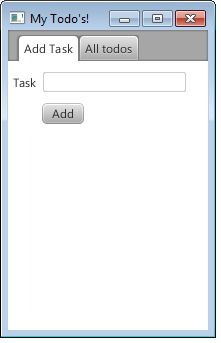
For the Add New Todo UI we would use: Tab, TabPane, TextField and Button.
Creating and adding to a Tab:
The components in the Tab for adding a new Todo are:
Field for adding the task name/title:
TextField tNameField = TextFieldBuilder.create()
  .build();
final StringProperty todoTitle = tNameField.textProperty();
We use properties to bind the values on the components, with binding the value/text in the component is automatically reflected in the property to which it is bound to. In this case the text of the TextField(tNameField) is bound to the a SringProperty called todoTitle. Read this if you want to get familiar with properties.
Button for saving the todo:
Button addNewButton = ButtonBuilder.create()
  .text("Add")
  .onAction(new EventHandler() {
    @Override
    public void handle(ActionEvent actionEvent) {
      Todo todo = new Todo(todoTitle.get());
      todoTitle.set("");
      try {
        TodoDAO.saveTodo(todo);
        labelMsg.set("Successfully added the task");
        labelVisibility.set(true);
      } catch (UnknownHostException ex) {
        ex.printStackTrace();
      }
    }
  }
)
.build();
Interesting to see here is the use of Builder Pattern for creating the components, this gives a great flexibility in terms of chaining the calls on the same instance. We also added the action for the button, obvious action is to save the Todo. People familiar with Swing applications would be aware of adding action listeners by creating an anonymous inner class. In JavaFX components we create an instance of EventHandler and override EventHandler#handle(ActionEvent) method. With Java 8, these can be replaced by using Lambda expressions/closures.
The components created above should be added to the Tab, and we make use of GridPane to align these components. GridPane is a layout component which allows placing of components into different grids. Aligning the components in GridPane we have,
GridPane addNewPane = GridPaneBuilder.create()
  .hgap(5)
  .vgap(5)
  .build();

addNewPane.add(msgLabel,1,2,2,1);
addNewPane.add(tNameLabel,1,3);
addNewPane.add(tNameField,2,3);
addNewPane.add(addNewButton,2,5);

Tab addNewTab = TabBuilder.create()
  .content(addNewPane)
  .text("Add Task")
  .closable(false)
  .build();
Looks like we have completed building the Add New task UI. Let me put together all these creation code:
import javafx.application.Application;
import javafx.beans.property.BooleanProperty;
import javafx.beans.property.SimpleStringProperty;
import javafx.beans.property.StringProperty;
import javafx.collections.FXCollections;
import javafx.collections.ObservableList;
import javafx.event.ActionEvent;
import javafx.event.EventHandler;
import javafx.scene.Scene;
import javafx.scene.control.*;
import javafx.scene.image.Image;
import javafx.scene.image.ImageView;
import javafx.scene.image.ImageViewBuilder;
import javafx.scene.layout.*;
import javafx.stage.Stage;
import net.javabeat.db.Todo;
import net.javabeat.db.TodoDAO;

import java.net.UnknownHostException;
import java.util.List;
import java.util.Set;

public class TodoAppRunner extends Application{

  public static final int APP_WIDTH = 200;
  public static final int APP_HEIGHT = 300;

  public static void main(String[] args)
    throws UnknownHostException{
    Application.launch(args);
  }

  @Override
  public void start(Stage stage) throws Exception {
    BorderPane root = new BorderPane();
    Scene scene = new Scene(root, APP_WIDTH,APP_HEIGHT);
    Tab addNewTab = buildAddNewTodoUi();
    TabPane tabPane = TabPaneBuilder.create()
      .tabs(addNewTab)
      .build();

    root.setCenter(tabPane);
    stage.setScene(scene);
    stage.setTitle("My Todo's!");
    stage.show();
  }

  private Tab buildAddNewTodoUi(){
    Label msgLabel = LabelBuilder.create()
      .text("")
      .visible(false)
      .build();

    TextField tNameField = new TextField();

    final StringProperty todoTitle = tNameField.textProperty();
    final StringProperty labelMsg = msgLabel.textProperty();
    final BooleanProperty lblVisibility = msgLabel.visibleProperty();

    Label tNameLabel = new Label("Task");
    Button addNewButton = ButtonBuilder.create()
      .text("Add")
      .onAction(new EventHandler() {
        @Override
        public void handle(ActionEvent actionEvent) {
          Todo todo = new Todo(todoTitle.get());
          try {
            TodoDAO.saveTodo(todo);
            labelMsg.set("Successfully added the task");
            lblVisibility.set(true);
            todoTitle.set("");
          } catch (UnknownHostException ex) {
            ex.printStackTrace();
          }
        }
      })
      .build();
    GridPane addNewPane = GridPaneBuilder.create()
      .hgap(5)
      .vgap(5)
      .build();

    addNewPane.add(msgLabel,1,2,2,1);
    addNewPane.add(tNameLabel,1,3);
    addNewPane.add(tNameField,2,3);
    addNewPane.add(addNewButton,2,5);

    Tab addNewTab = TabBuilder.create()
      .content(addNewPane)
      .text("Add Task")
      .closable(false)
      .build();

    return addNewTab;

  }
}
The source code can be downloaded from here.
In my next post, I will show how to create a UI for listing all the unfinished Todos, and set the Todos as completed from the UI.